- Free Dota Template
- Cinematics
- Color Codes
- Dialog Boxes
- Multiboards
- Abilities - Buffs and Spells
- Abilities - Guide
- Abilities - Introduction
- Advanced Skinning in Photoshop
- AI - Basics and Triggers
- AI - The Editor
- Start Here
- General FAQ
- Cameras
- Campaign Basics
- Elevator Switches
- Formula Finder
- Unit Editor
- Trigger Basics
- Variable Basics
- Attachments
- Creating Icons
- Custom Tiles
- Editing Skins
- Fade Filters
- Importing Models
- Loading Screen
- Minimap Image


|
|
 |
 |
|
General - GUI Crash Course - A Basic GUI TutorialTutorial By AndrewgosuGUI CRASH COURSE The purpose of this tutorial is to introduce and teach the basics of triggering using Warcraft 3 World Editor. REQUIREMENTS: - An authentic copy of Warcraft 3: The Frozen Throne - (Warcraft 3: Reign of Chaos editor will suffice, too) If you are not familiar with the rest of the World Editor, not only Trigger Editor, you should read the following tutorial first: Getting Started in the World Editor http://www.thehelper.net/forums/showthread.php?t=28963 - Darthfett TABLE OF CONTENTS Chapter one - setting up the editor Chapter two - events, conditions&actions Chapter three - conditionals and loops Chapter four - variables Chapter five - ending words CHAPTER ONE - SETTING UP THE EDITOR Before starting to trigger anything at all, we have to modify some settings to make our lives easier later. After all, it's vital to check your tools before starting to work with them – you don't want to get decapited by a chainsaw simply because you didn't check its chain. Load World Editor (later: WE) and open „File -> Preferences“. You can see six tabs. We're interested in only three: „General“, „Test Map“ and „Visual“ (optional). Open the „General“ tab and tick the „Automatically create unknown variables while pasting trigger data“ and „Allow negative real values in Object Editor“ field. The first option does exactly what it says and proves very useful later, when transferring triggers between different maps. The second option is quite self-explanatory. 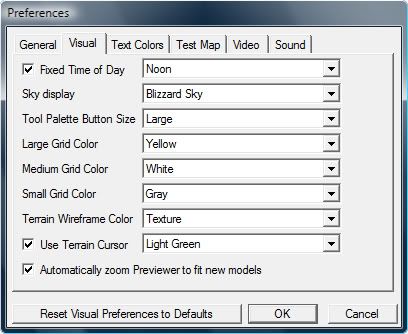 Next, open the „Test Map“ tab and untick the „Use fixed random seed“ option. Unticking this option allows you to retrieve random numbers without problems as the seed to generate them is not fixed anymore (you'll soon realise why this is important). 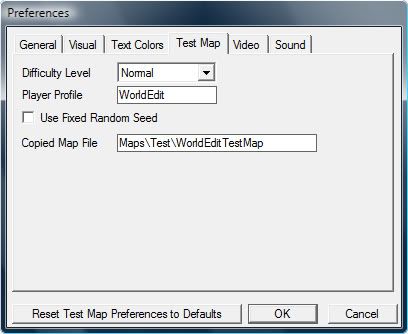 After that, open the „Visual“ tab and tick the „Fixed time of day“ box and select the time of day. To make testing easier, I've chosen „noon“ as the sunshine will make everything brigther and easier to see. This step is optional, if you like the the day-night rotation cycle. [INDENT]NOTE #1: This option does not affect the day-night cycle in-game, just the cycle inside the editor. 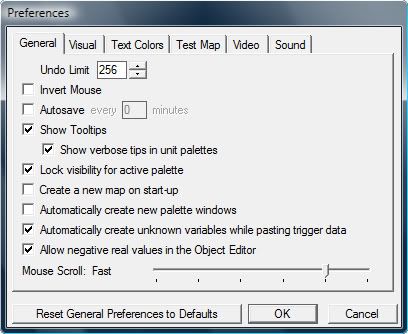 Lastly, to speed up the editor, we need to do one last thing. Go to „Windows“ and untick the „Brush List“ option. This will significantly speed up the editor, because it doesn't have to generate new brushes in the preview window anymore. Like this says you something. :) 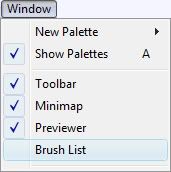 CHAPTER TWO - EVENTS, CONDITIONS & ACTIONS Proceed by creating a new map by selecting „File -> New Map“ or just pressing CTRL + N. Choose the tilesets, other preferences you like, or leave them as they are, and click OK. Next, open the Trigger Editor by pressing F4 or going to „Module -> Trigger Editor“. 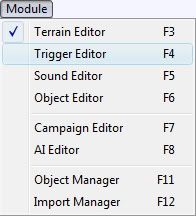 You should see a trigger called „Melee Initialization“. 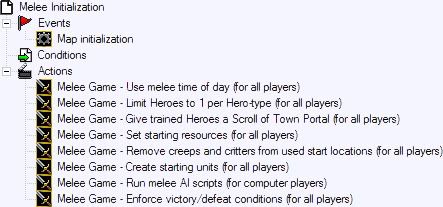 New concept – an event Something that happens at a given place and time; (in programming) sensor outputs or user actions which determine the flow of the program. New concept – a condition A proposition upon which another proposition depends. New concept – actions The code that is ran when the event is fired and the conditions to run the code are met. New concept – a trigger A piece of code that is automatically executed and evaluated upon event fire; the events, the conditions and the actions as a whole. Now, as you can see from the "Melee Initialization" trigger, a trigger consists of events, conditions and actions. As there are too many of them to individually list here, I'll explain the more important ones, as well as the ones you are likely to use wrongly: EVENTS • Map initialization - fires during loading screen - you cannot create multiboards or leaderboards during map "init" - you can display messages during "init", but it's likely they are already disappeared when the game finishes loading - you can create floating texts during map "init" (Generic unit event) • Unit - A unit Is attacked - fires when a unit is attacked - does not necessarily mean the attacked unit has taken damage! (Generic unit event) • Unit - A unit Begins casting an ability - fires when a unit starts to cast an ability, before any mana is deducted! (Generic unit event) • Unit - A unit Starts the effect of an ability - fires when the ability has started its effect, mana has been deducted. - you should normally use this event intead of the previously mentioned one, to avoid abusing. CONDITIONS (Boolean comparison) • ((unit) has buff whichBuff) Equal to True - Dead units don't have buffs, keep in mind when using this condition EVENT RESPONSES When an event is fired you'll get to use the event responses for that particular event. For example, when the event "a unit starts the effect of an ability" is launched, the "Triggering unit" (event response) is the unit doing the casting and the "Ability being cast" (event response) is the ability cast by the triggering unit. Usually, when you pick an event, World Editor shows you what kind of event response is the right to use (the gray text): 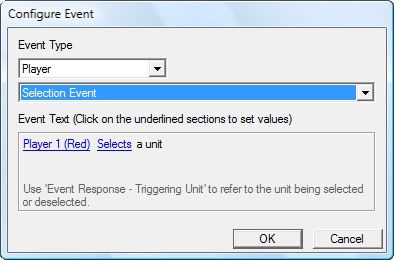 There are awfully lot of event responses, so again, I'll list the more important plus the ones you're likely to use wrongly: • Casting unit - event response to casting unit events - unstable after waits, use "Triggering unit" instead! • Picked unit (player) - the picked unit inside a unit group loop (see next chapter for unit group loops) • Matching unit (player) - the matching unit for unit matching conditions - WRONG: - Pick every unit in (Units within n of point matching (((Picked unit) is A Hero) Equal to True)) - RIGHT: - Pick every unit in (Units within n of point matching (((Matching unit) is A Hero) Equal to True)) CHAPTER THREE – CONDITONALS&LOOPS Now, lets say you've made your trigger, added all the needed events and conditions and you're about to code the actions. However, there's a small problem: you need to run one action if a particular condition is true and an other action, if it isn't. How to do that? The answer to the problem is: conditionals. New concept – conditionals Where a given action is executed if a condition is met while another action is executed otherwise. To create a conditional, go to the actions drop-down menu and search for „if/then/else – (Multiple functions)“ action. Here's an example: 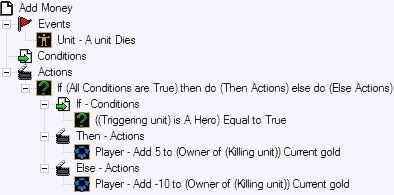 Next, what if you have an action you want to repeat over and over again? Well, you can simply copy&paste it as many times as you need, but that's pointless and takes time. Plus it looks bad. Instead, you can use loops. New concept - loop A piece of code that performs a series of instructions repeatedly until some specified condition is satisfied. To create a loop, open the actions drop-down menu and search for „For Each Integer A, Do Multiple Actions“. Here's an example: 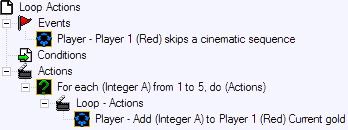 NOTE #2: You can use waits inside a loop. Next, if you know how to loop actions you might wonder: how can I loop through players or units and do something with each one of them? It's rather simple, you must use player or unit group "loops". To use a player or a unit group loop, search up the "Player Group" or "Unit Group" action. Here's an example of both of them: 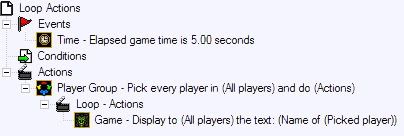 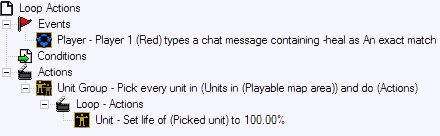 NOTE #3: You cannot use waits inside a player or a unit group loop. CHAPTER FOUR – VARIABLES Sometimes you will find yourself in a situation where you have gathered some data but like to access it later, not this instance. The only problem is that it might be gone or overwritten the next second. How to solve this kind of problem? You must store the information to a variable. New concept - variable Something that is likely to vary; something that is subject to variation Think of variables as containers for information, which are accessible whenever needed. To create a variable, open the Variable Editor (Ctrl + B) or click the  button. Next, click the New Variable button button. Next, click the New Variable button  (CTRL + N). You should see the following screen: (CTRL + N). You should see the following screen: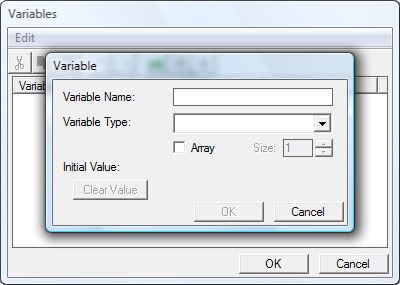 Next, give your variable a name and pick a type, depending on your needs, and you're all done. VARIABLE ARRAYS As you can see, you can tick the checkbox "Array" to make the variable arrayed, with indexes to access each array element. When you tick that checkbox, the option "size" also becomes available. This option, actually, does not modify the number of arrays for that variable, but initializes as many arrays to the default value as you inserted. Array variables are always the size of 8191, meaning, the last index you can use is 8191. Anything above 8191 will not work. You cannot use negative numbers. SETTING A VALUE TO A VARIABLE When you're done with your variables, you want to use them in triggers and assign them a value. That's done with the "Set Variable" action.  (e.g) Setting an array variable using a loop:  Each index from 1 to 10 will get assigned a random number. CHAPTER FIVE – ENDING WORDS We have now reached to the end of this tutorial and I hope this little guide has teached you the basics of coding in World Editor using GUI. Now, take your time to experiment and practise, as practise makes perfect. Here are some additional tutorials you might want to read, to make your code and your map better! How to spot and clean memory leaks, which make your game "lag": http://www.thehelper.net/forums/showthread.php?t=122226 - emjlr3 Designing a Map for the Warcraft III Player http://www.thehelper.net/forums/showthread.php?t=122226 - Darthfett If you would like to skip triggering in GUI and go straight to JASS, the code behind GUI, check out this tutorial: JASS Crash Course http://www.thehelper.net/forums/showthread.php?t=116495 - Andrewgosu Thanks for reading! Feedback is always appreciated! Andrewgosu [/INDENT] Click here to comment on this tutorial. |
||
 |
 |
| Designed by Arkheno
2005 Blizzard Entertainment® Blizzard Entertainment is a trademark or registered trademark of Blizzard Entertainment, Inc. in the U.S. and/or other countries. All rights reserved. |


Team Griffonrawl Trains Muay Thai and MMA fighters in Ohio.
Apex Steel Pipe - Buys and sells Steel Pipe.