|
|
 |
| |
Terraining - Water Level
Tutorial By Quake19
Hey, fellow forumers!
I've decided to write my first tutorial at the forum. Hope it'll help out people with making cool water terrains. :rolleyes:
===========================================================
"The Water Level Tutorial"
===========================================================
- Notes: Step-by-step information on how to create water on different levels, or elevation if you prefer the term.
> > > > Follow each of the steps as described and you should get the gist of it.
> > > > Before doing anything, make sure you turn off the "Enforce Water Height Limits" under the "Advanced".
Step 1: Create a new map to try on. Nothing too big is needed; 32x32 will do.
Step 2: Open the Terrain Palette and choose "Raise" under the "Apply Height".
Step 3: Use the now-selected brush to raise a hill on your map. Make it high, so you can clearly see the difference. Notice, having a large brush size might make things easier for you.
- Notes: After raising the hill, use the "Plateau" brush under the "Apply Height" to make your hill even.
> > > > Placing water on hills that are not even can cause some weird and often unwanted effects.
Step 4: From the Terrain Palette choose "Shallow Water" or "Deep Water" under the "Apply Cliff".
Step 5: Use the now-selected water brush to create water on your high hill. It doesn't matter how much water you create, as long as it doesn't go over the borders of your hill.
- Notes: You could already stop here, but I do not recommend it. It's not a good idea to use cliff-water.
> > > > By following the next steps, you can make the water smooth. I highly recommend this.
> > > > Notice if you plan on making smooth water; make bigger water areas, for they will shrink when lowered.
Step 6: From the Terrain Palette choose "Same Level" under the "Apply Cliff".
Step 7: Use the now-selected brush to remove the cliff around the water. Notice, you must start moving the brush outside of your water area. Remove all water and the cliffs.
- Notes: If you have done everything correct, you should have a plain hill again, with no water in sight!
> > > > But looks are deceiving; the water is just under the surface of your hill.
Step 8: From the Terrain Palette choose "Lower" under the "Apply Height".
Step 9: Use the now-selected brush to lower those areas of the hill where you previously had water. Quite so, you'll soon see your water again!
- Notes: After you first lower your hill and reveal the water beneath it, the water might look jagged.
> > > > Use the "Raise" and "Smooth" brushes under the "Apply Height" to fix the inconveniences.
> > > > Use these two brushes at the jagged borders of your water, and it should soon look smooth.
Step 10: You don't need one if everything went fine! :D
===========================================================
Quake19
===========================================================
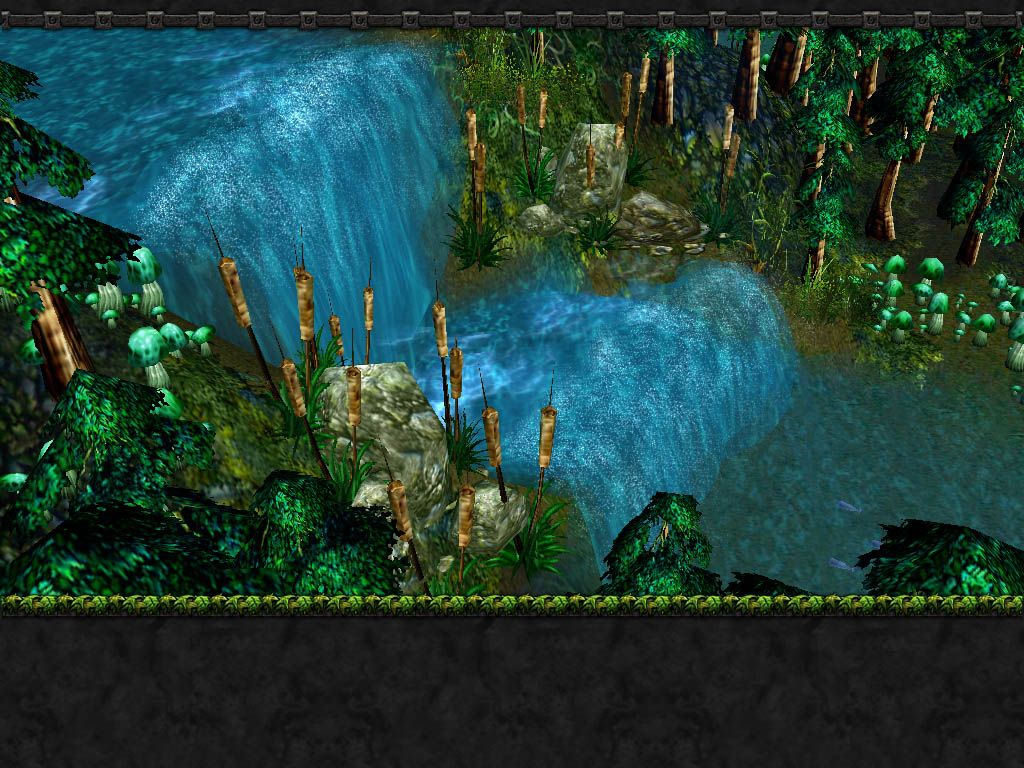
Screenshot #1: http://i17.photobucket.com/albums/b61/Quake19/a9e3423c.jpg
Screenshot #2: http://i17.photobucket.com/albums/b61/Quake19/987a63fa.jpg
- Notes: Differing water levels if used in conjunction with waterfalls can create some really cool scenery.
> > > > Don't make a flood though; you don't want cool stuff to appear as redundant.
// You're welcome to give feedback!
// Suggestions, corrections and screenies are all welcome.
// Quake19, over.
Click here to comment on this tutorial.
|
|
 |
|
 |
Designed by Arkheno
2005
Blizzard
Entertainment®
Blizzard Entertainment is a trademark or registered trademark of Blizzard
Entertainment, Inc. in the U.S. and/or other countries. All rights
reserved. |
|


