- Free Dota Template
- Cinematics
- Color Codes
- Dialog Boxes
- Multiboards
- Abilities - Buffs and Spells
- Abilities - Guide
- Abilities - Introduction
- Advanced Skinning in Photoshop
- AI - Basics and Triggers
- AI - The Editor
- Start Here
- General FAQ
- Cameras
- Campaign Basics
- Elevator Switches
- Formula Finder
- Unit Editor
- Trigger Basics
- Variable Basics
- Attachments
- Creating Icons
- Custom Tiles
- Editing Skins
- Fade Filters
- Importing Models
- Loading Screen
- Minimap Image


|
|
 |
 |
|
Game Interface - BasicsTutorial By jonadrian619Game Interface Tutorial: The Basics by jonadrian619 Version 2 1) Introduction 2) The Game Interface Dialog fields 3) Basic Game Interface Tutorials 4) Conclusion 1) Introduction: This tutorial will provide you the basics for using the Game Interface dialog. All explanations of it's fields are here. There are also some tips and tricks for making very unique and cool game interfaces. This will help you make your map more unique with the use of customized game interfaces. Read this tutorial before getting started to my advanced game interface tutorials. 2) The Game Interface Dialog fields: Before you start, it's best that you study the fields of the Game Interface dialog. Here are some useful definitions about the fields of the Game Interface dialog for you to know. Icon - Attack Type: Defines what icons a specific attack type uses, like Chaos, Pierce and Normal, that's shown at the bottom of the screen when an attacker unit is selected.  Icon - Command: Defines what icons are used for certain unit commands (e.g. Attack, Attack Ground, Hold Position, Stop, Patrol, Cancel, Repair, Rally, Hero Attributes button, Build Structure, etc.), It also allows you to edit the icon Hightlights (The green border around an icon after you click it). 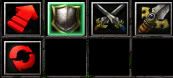 Icon - Defense Type: Defines what icons the following Defense Types use: Fortified, Medium, Small, Heavy, Divine, Unarmored, Hero. Icon - Minimap: Defines what icons are used by the minimap.. (Ally Color Mode, Formation, etc.) 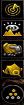 Icon - Replay: Defines what icons a replay in the command card uses (Increase Speed, Pause Replay, Restart). It only takes effect in a Saved Replay of a previously played map with customized Replay interfaces. 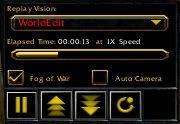 Icon - Scorescreen: Allows you to define what kind of style your scorescreens will look, for all races. This thing is quite advanced, since you need multiple images to make up the whole screen, similar to the concepts of Loading Screens that use four or more images. Image: These stuff are quite hard to modify. Menu Backgrounds, Console Textures, Multiboard Textures, Tooltip Icons, Tooltip Backgrounds and all others are part of this field. This field allows you to edit what styles the objects listed above can use. Model: Defines what models are used by certain interfaces, such as the Bounty Art, and much more. Sound: Defines the warning sounds that are triggered on certain in-game events. For example, you can edit what sound can be triggered if a unit runs out of mana when he casts a spell or when a gold mine has collapsed. (e.g. Job's Done, Not Enough Mana, Can't Build There) Text - General: Defines the text of many basic interfaces like Quest Dialogs, Upkeep, Attack Type and Description, Dialog Descriptions, Hero Attributes, Status, etc. Most of these are descriptions or names of certain interfaces. Text - Message: Defines certain warning or error messages in Warcraft III TFT, such as Must target a ground unit, not enough gold, spell is not ready yet, already at full health, full mana, etc. Text - Unit Classification: Defines the names of the four unit classifications that can be read in-game: Giant, Mechanical, Tauren and Undead. NOTE: When emptying a text field, make sure you make a space (press the spacebar) so that it will not return to the default text. Those are the fields of the Game Interface, it's a reference that can be used in the future. Next, you'll learn how to customize the basic game interface, not the advanced yet. 3) Basic Game Interface Tutorials: I'll make a separate section for this topic inside this tutorial. These sub-tutorials will help you polish your skills in Game Interfaces a bit, and then make your own. These are common game interfaces, so I'm listing them all here. Tutorial 1: Quest Dialog Go to Game Interface. Check the 'Custom game interface' checkbox and then find the following fields below. (These fields are under the 'Text - General' fields, don't get confused.) - 'Quests' - 'Quests' (|Cfffed312F9|R) - 'Quest Status' - 'Quest Not Yet Discovered' - 'Quest Description' - 'This dialog displays all of the current quests which you have been given.' Those fields make up most of the Quests dialog. Now, change those fields to any name you want, something different and meaningful AND interesting/unique. You can change 'Quests' to 'Missions' or 'Map Info' instead, anything different from Warcraft III or your own words. Then change the 'Quest Not Yet Discovered' field to any text you want. I'll use 'Info Unavailable' or 'Mission Not Yet Initiated'. Change the 'This dialog displays all of the current quests which you have been given.' field. Change it to something meaningful, like 'This dialog displays all of the necessary info the users can read'. Tutorial 2: Resources, Idle Workers and Food/Upkeep interface Gold, Lumber, Idle Workers and Food are overused too and are looking like crap. For custom interfaces, it's best that you change these things. Go to Advanced --> Game Interface. Part A: Icons of Resources and Idle Workers First, find the following fields in the Game Interface dialog - 'Icon - Gold' - 'Icon - Idle Workers' - 'Icon - Food' - 'Icon - Lumber' Then change the icons to something meaningful, and cool, like a 'Faceless One' icon for Idle Workers, A Monsoon icon for Gold defining 'electricity', or a Bullet icon for lumber, that can be used as ammo for the Systems made by users. Make up your own ideas and construct them. Now time for the descriptions. Find the following fields... - 'Text - General - The amount of food you are using over the total amount you can currently sustain.' - 'Text - General - Gold is mined from gold mines.' - 'Text - General - Lumber is harvested from trees.' Change them to something unique and a description that matches the icons of course!! Use your own words.  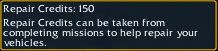   Part B: Upkeep Upkeep interfaces are very ugly when unchanged, unless it's a melee map. Just believe me and you won't regret. Change them at any means necessary. Find the following fields - Text - General - |N%d-%d Food: %s|R (%d%% G, %d%% L) - Text - General - |N%d-%d Food: %s|R (%d%% income) Looks gibberish to you. But for those who don't know: it's a field that shows Raw Data for Upkeep. G is gold, L is lumber amd %d, %s and other percent fields define income rate. Remove them, since there's a crappy WE bug that makes them repeat over three times in the Upkeep section. Then find the following fields: (these fields set the tooltips of the Upkeep interface) Text - General - |cffff0000High Upkeep (Ignore the High Upkeeps with numbers, they're useless) Text - General - |Cff00ff00No Upkeep Text - General - |Cffffff00Low Upkeep Change those fields to something nice. When your map does not use Food as an asset for players, then change all of those fields to the Name of the Map Maker, Map Version or something else you want, like for example, the title of your map. IF it does become an asset for the players, change it to something unique, like Supplies, Psi or Control (for starcraft type maps), or use your own words. Then find the 'Text - General - Upkeep is determined by the amount of food your forces are currently using' field. Edit that field and type something like a short description of your map or contact/email adress, short credit, short version changelog, etc.   At times, when you reach certain food levels, to be exact, 50, 80, the Low Upkeep or High Upkeep (or what you've modified), shows at the top of the screen. I thought there was no way on how to fix it but I found it then. To remove that crappy thing, simply go to Gameplay Constants dialog. Set the first two integers of "Upkeep - Food Levels" field to 300 (maximum integer that field can handle). That way, it can't show up until it goes 300. Usually players can't reach 300 food and only go to 100-200 food.. This will help you make your upkeep interface more neat. There's a way to remove the "100%" that always shows up in the upkeep interface, exactly the way DotA hidden it.. Go to Game Interface, then find Text - General - Gold Income Rate. Type anything you want there, like a link to the thread of your map or it's forum (if it's a hosted project), after that, place this hex color code beside it: |c22222222 That way, it can't be easily shown by players. It can, however, be seen in bright terrain such as snow but it's still almost unnoticeable to the naked eye. For a more undetectable color, try using |c00101c29. Tutorial 3: Hero Stats and Hero Interface (New) I've decided to add this section to the tutorial, thanks for PurplePoot for reminding me of this. It's a mini-tutorial on how to change the Hero Stats, Hero info panel interface and some tips. Part A: Text & Tooltips Go to the Game Interface dialog. Then pay attention to these fields. Text - General - 'Strength' Text - General - 'Agility' Text - General - 'Intelligence' Note: There are more than 2 fields for each attribute, like the one having a colon after the end like 'Strength:'. Modify the fields with the colon (:) properly and don't remove the colons else it goes out looking like crap. Maybe it seems that those extras show up in different areas. Now change them to a name suitable for each attribute. Like Power or Magic or Speed, anything you could imagine. There are also these fields in which I can't identify their purpose. Text - General - '|Cffffff00Strength|R' Text - General - '|Cffffff00Agility|R' Text - General - '|Cffffff00Intelligence|R You can, however, just try modify them and see what happens. Next, pay attention to the following fields. 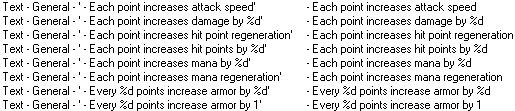 These fields are compiled in a tooltip which shows the bonuses provided by each attribute. The %d's are all raw data that shows the bonuses given by each attribute and the fields it's related to in the Gameplay Constants. Don't change them, or better yet, replace them with characters or numbers. To modify how much bonuses each attribute is given go to Gameplay Constants > 'Hero Attributes' fields. Next, find the Text - General - '|cffffff00Primary Attribute|r' field. This is the text that appears above your Primary Attribute inside the tooltip. Also find the Text - General - 'Hero Attributes:' field. It's the text that shows up at the top of the tooltip. Part B: Icons and the XP Bar Now you have to modify your Hero XP Bar. Thankfully Orc_Tamer has made a tutorial about this. Click below to see how. How to change the Hero XP Bar by Orc_Tamer To change the icons of each Hero Attribute, open the Game Interface dialog and find the following: Icon - Hero Agility (Info Panel) Icon - Hero Intelligence (Info Panel) Icon - Hero Strength (Info Panel) Only modify the ones which have the '(Info Panel)' suffix displayed. I don't know about the others, what they do or what things they show up. Now change them to any icon you prefer. Make sure they are of the same size as of the other icons. Here is the result: 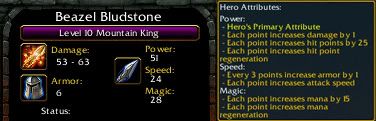 Trick: You can use Hex color codes (|cffffcc00, etc.) to make your text more colorful and fancy, this applies to all fields mentioned all over the tutorial. You can even use Gradient colors, you can use Magos' Model Editor, GradientMixer or any color making tool in wc3campaigns or The Hive. 4) Conclusion: That's it!! You've done the basics. If you're having a problem in game interfaces or just want something new, or you're demanding for a new tutorial, tell it to me so that I'll be informed. Credits: PipeDream - for the way removing the 100% thing. I simplified it so that it could be much easier to do it. Have fun customizing your game interface!! ~jonadrian619 Click here to comment on this tutorial. |
||
 |
 |
| Designed by Arkheno
2005 Blizzard Entertainment® Blizzard Entertainment is a trademark or registered trademark of Blizzard Entertainment, Inc. in the U.S. and/or other countries. All rights reserved. |

Team Griffonrawl Trains Muay Thai and MMA fighters in Ohio.
Apex Steel Pipe - Buys and sells Steel Pipe.