A three parts dialog tutorial
By AceHart
Part 1 - Dialogs for the impatient
For those that don't really need an example, and know triggers already well enough.
The most basic overview of what's needed to get a dialog up and running.
Part 2 - My first Dialog
The basics, for those that never did any dialogs before
and want a step-by-step guide on how to get started.
Part 3 - Choosing a Hero - A complete example
Building on the steps shown in part 2,
here we develop a complete "Choose a Hero" Dialog,
with all the details.
For those with more advanced needs.
Have fun and a good read.
And don't be afraid to ask in the forum.
Yours
AceHart
1. Dialogs for the impatient
1.1 Variables
Create a variable of type "Dialog".
Create a variable of type "Dialog Button", for every button your dialog is going to have.
1.2 The Dialog
- Events
- Time - Elapsed game time is 1.00 seconds
- Conditions
- Actions
- Dialog - Clear myDialog
- Dialog - Change the title of myDialog to "Some text"
- Dialog - Create a dialog button for myDialog labeled "Text to show on button"
- Set myButton = (Last created dialog Button)
- Dialog - Show myDialog for Player 1 (Red)
1.3 Doing something
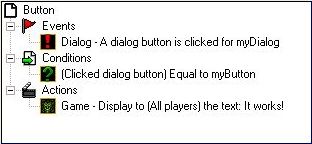
- Events
- Dialog - A dialog button is clicked for myDialog
- Conditions
- (Clicked dialog button) Equal to myButton
- Actions
- ... do something here ...
2. My first Dialog
The most basic dialog looks something like this:
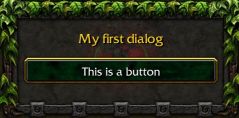
It's a box, with a title at the top, here it says "My first dialog"
And a button, also with some text: "This is a button".
To get this on the screen, you first need a variable, of type "Dialog".
The looks, title, buttons, button text, are stored in that variable.
So, open up the Trigger Editor.
Click the "new variable button" (the yellow X),
click on "new variable" (the green X),
then make it look like this:
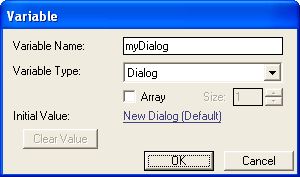
And confirm with "Ok".
Now we have a variable we can work with.
Next, we're going to need a new trigger,
that will use this variable to set the title, add a button and show it on the screen.
Back in the Trigger Editor, right-click on one of the triggers that are already there,
and choose "new trigger".
Give it a name, like "MyFirstDialog".
Then we need an event.
Without event our trigger will not run.
Since this is a simple dialog example, with not much else going on,
the easiest event is "elapsed game time".
When the game starts, there is some kind of clock running,
that counts how much time has passed since the game started.
Right-click on "Events" (in the lower right part) and choose "New Event".
In the window that comes up there, where is says "Map initialization",
select "Time - Time elapsed".
The text below will then change to "Elapsed game time is 5.00 seconds".
With a click on the blue "5.00" you could change the time.
Five seconds is ok though for this example.
Confirm your choice with "Ok".
Note that we can not show a dialog at Map initialization.
That's too early. At that point there's nothing in the screen yet.
We do not need a condition.
But, we do need a new action.
Again, right-click the "Actions", and choose "New Action".
In the "Action type", that says "All", choose "Dialog".
This leaves only four (4) choices in the drop-down below:
"Show / Hide",
"Change Title",
"Create Dialog Button" and
"Clear"
We're going to need all of them, the first one being "Clear".
Choose "Clear" then.
In the text below we then can choose which dialog we want to clear.
Click on it, click on "Variable" and make sure the variable is "myDialog".
Confirm with "Ok".
Confirm with "Ok", one more time.
Our first dialog action is ready, it says "Dialog - Clear myDialog".
Dialogs should always be cleared before you start using them.
It's to remove any "mess" that might be there and that you don't want to show.
New action, this time "Change Title".
For "Dialog", we choose again "myDialog".
Then click the "Title" and enter some text, "My first dialog" for example.
Confirm with "Ok" as needed.
Once done, the action will say "Dialog - Change the title of myDialog to My first dialog"
New action, "Create dialog button".
Change "Dialog" to "myDialog" as before (click, variable, myDialog, Ok).
Click on "text" and enter some text.
That's the text that will appear on the button.
This example uses "This is a button".
Confirm with "Ok" as needed.
New action, "Show / Hide".
"Show" should already be there.
"Dialog", as before, needs to be changed to "myDialog".
Finally, we need to choose a player that's going to see our dialog.
"Player 1 (red)" is a good choice here.
Here's the trigger as it looks up to here:
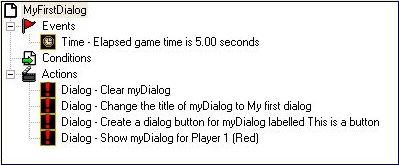
You could already run the map at this point.
Five seconds into the game, the dialog would show up, and you could also click the button.
However, nothing would happen.
The game has no idea yet what we want to do with that dialog.
So, we first need to tell it.
With yet another trigger.
Make a new trigger, give it some name. I will call it "Button".
Note that these names are of no importance to the game.
They are only for you.
However, if you look at a map you made three weeks ago,
and you see a trigger called "Untitled trigger 017",
do you still know what it was doing?
That's why you should always choose a name that actually tells you something about the trigger.
This trigger needs an event too.
There's a ready to use event called "Dialog - Dialog button click".
So, right-click "Events", and choose it.
As before, "Dialog" needs to be changed to "variable", "myDialog".
Confirm with "Ok".
Since our dialog here only has one button, there's no problem with knowing which button was clicked.
But, dialogs can have multiple buttons.
And we need some way to, later on, decide which button was clicked.
That's done with the help of "variables", of type "Dialog Button".
Create a new variable, like this:
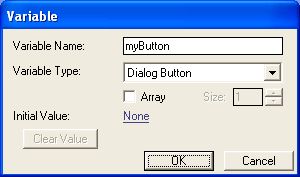
Then this variable needs to hold the actual button.
The action that does that is called "Set variable".
You'll have to use it immediately after you create a button.
Go back to the "MyFirstDialog" trigger, select the line "Dialog - create a dialog button ...",
then right-click and "New Action".
The action will be "Set variable".
Once you found it, click on the "variable" below,
and choose "myButton",
then click on value and choose "(last created dialog button)".
Confirm with "Ok" as needed.
The complete trigger should look like this:
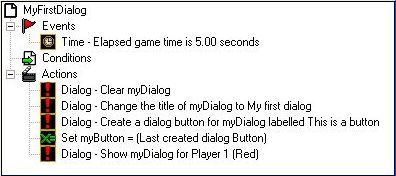
If your actions are in the wrong order, move them around.
Click on an action, keep the button down, move up or down as needed,
and let the button go when your are at the correct place.
Now we can complete the "Button" trigger.
We're going to add a new condition, that checks for our button.
Right-click, as usual, the "Conditions", select "New Condition".
The condition we're looking for is "Dialog Button Comparison".
Find it in the list.
The part "(clicked dialog button)" is ok already, since we want to compare the button that was clicked with ours.
"Value" needs to be changed to our button ("variable" and "myButton").
"Ok" as always.
All we need then is some action.
As an example, lets add the action "Game - Text message (auto-timed)",
and set the text to whatever you like to see on screen.
The completed trigger:
All that's left to do now, is running the map and seeing our first dialog in action.
Which completes the very basics of Dialog handling.
Congratulations.
3. A complete example, with all the details
What we want to do here, is create a Dialog that allows the player to select a Hero.
- To make it more interesting, we'll cut it into two parts:
-
- Dialog 1, with four (4) Heroes to choose from
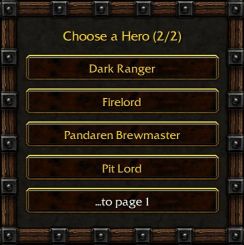
- and Dialog 2, with four (4) more.
- Each Dialog will also have a button to show the next or the previous "page".
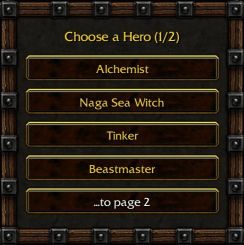
It's supposed to look like this:
3.1 Setup
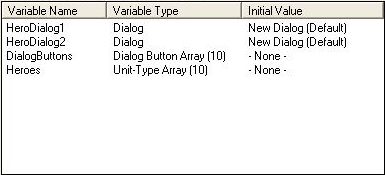
Since we have two different Dialogs, we're also going to need two different dialog variables.
In the following parts, those dialog variables are called "HeroDialog1" and "HeroDialog2".
The "title", for us, here, will be
"Choose a Hero (1/2)" and
"Choose a Hero (2/2)".
The buttons?
Every button we want, later on, to refer to, i.e. to use it, will need to be, somehow, remembered.
With, obviously, yet another variable, of type "Dialog Button".
How many buttons do we need?
Remember, what we are trying is selecting a Hero.
We have eight (8) Heroes in our Dialogs, and two (2) "navigational" buttons.
That's ten (10) buttons, all in all.
We could, of course, create ten (10) variables of type "Dialog Button".
But, there's a much simpler way: we're going to use an array.
We'll only have one "Dialog Button" variable, and we're going to give it room enough for storing all ten (10) buttons.
So, we'll have a variable, called "DialogButtons", of type "Dialog Button", being an array, and having a size of ten (10).
We still want the Heroes...
And some way to say, later on,
if button 1 was pushed, create Hero 1
if button 2 was pushed, create Hero 2
...
We also need some way to say:
if button "to page 1" was pushed, display page 1.
if button "to page 2" was pushed, display page 2.
Since we already have an array for our buttons, let's create one more array for our Heroes.
If we put the Heroes inside that array in the very same order as they appear in the dialogs,
we have our list.
New variable, of type "Unit-Type", being an array, of size ten (10).
Ten (10) buttons, but only eight (8) Heroes... so two places in the Hero array will have to stay empty.
That's where the buttons say "to next" or "to previous" page.
The variables will look like this:
3.2 The Triggers
We need to fill our Hero array.
Preferably at map initialization.
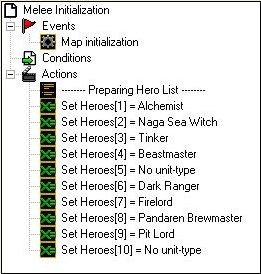
So, once we get to the dialogs, we'll make sure that button 1 will say "Alchemist", button 2 "Naga Sea Witch", and so on.
Button 5 will be "to page 2", and button 10 "to page 1".
The button setup needs to be done in a different trigger.
Dialogs can not be set up and shown at Map initialization.
That's too early. There's nothing on the screen yet at that point.
So, we "wait" a bit, one second here (if that's "too long", change it to "0.25"), and then we create and show them.
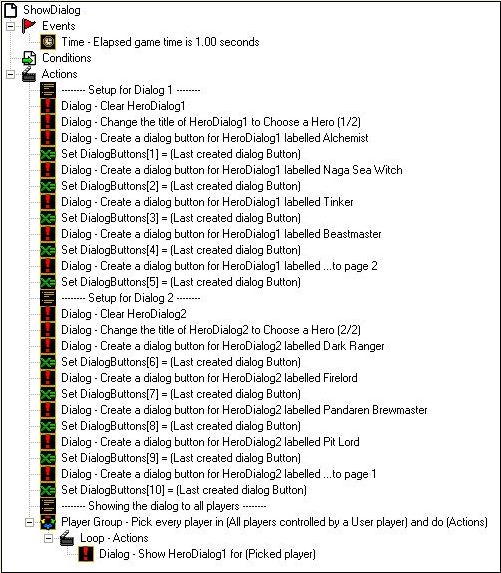
3.2.1 The different parts:
- Dialog - Clear HeroDialog1
Dialogs should always be cleared before you put any buttons inside.
It's, basically, to clean up any previous "mess".
- Dialog - Change the title of HeroDialog1 to Choose a Hero (1/2)
The text that shows at the top of the dialog.
- Dialog - Create a dialog button for HeroDialog1 labeled Alchemist
- Set DialogButtons[1] = (Last created dialog Button)
Our first button, with some text on it.
It will be remembered as "DialogButtons[1]".
- Dialog - Create a dialog button for HeroDialog1 labeled Naga Sea Witch
- Set DialogButtons[2] = (Last created dialog Button)
The same, for button 2.
- Dialog - Create a dialog button for HeroDialog1 labeled Tinker
- Set DialogButtons[3] = (Last created dialog Button)
- Dialog - Create a dialog button for HeroDialog1 labeled Beastmaster
- Set DialogButtons[4] = (Last created dialog Button)
You can already guess what those do...
Finally,
- Dialog - Create a dialog button for HeroDialog1 labeled ...to page 2
- Set DialogButtons[5] = (Last created dialog Button)
The button to switch to page 2.
Then we repeat all this one more time for the second dialog.
Once the dialogs and their buttons are ready, we can show the first one to the players:
- Player Group - Pick every player in (All players controlled by a User player) and do (Actions)
-
- Loop - Actions
- Dialog - Show HeroDialog1 for (Picked player)
We loop through all players that are controlled by a human player,
and use "Dialog - show".
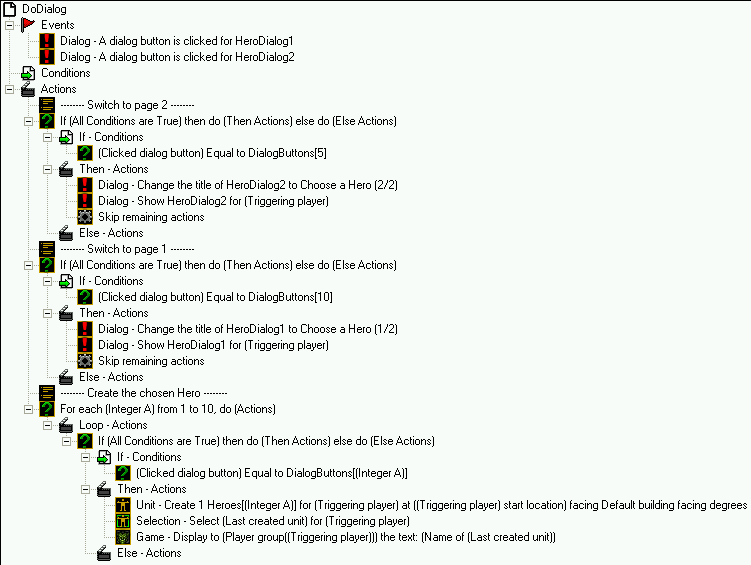
3.3 The Dialog trigger
Now we already have a dialog showing up on the screen.
It isn't doing anything yet, however.
The buttons work, but we'll need a trigger to get some action done:
First, the trigger:
Does everything we wanted our dialogs to do, in one go.
3.3.1 The details:
- Events
- Dialog - A dialog button is clicked for HeroDialog1
- Dialog - A dialog button is clicked for HeroDialog2
There's a special event, precisely for waiting on "buttons".
This trigger will be used for both dialogs together, so we can handle both events in the same trigger.
- Conditions
There aren't any conditions.
The only way to get a button event is through showing a dialog first.
- Actions
Here, it gets more interesting:
3.3.1.1 Switching to dialog 2
- If (All Conditions are True) then do (Then Actions) else do (Else Actions)
-
- If - Conditions
- (Clicked dialog button) Equal to DialogButtons[5]
- Then - Actions
- Dialog - Change the title of HeroDialog2 to Choose a Hero (2/2)
- Dialog - Show HeroDialog2 for (Triggering player)
- Skip remaining actions
- Else - Actions
Our condition here does a "Dialog Button Comparison".
If the button was "to page 2" we show the second dialog to the player that clicked the button.
And, if it was that button we also "skip remaining actions", so the trigger will finish here.
Note:
Just before showing the dialog again, we reset its title.
This is, unfortunately, required.
If you don't and simply switch a couple of times between the two, you'll notice that the title disappears!
Setting the title every time before showing the dialog prevents this.
There's no need to remove the dialog that was there before.
They automatically disappear whenever a button is clicked.
3.3.1.2 Switching to Dialog 1
- If (All Conditions are True) then do (Then Actions) else do (Else Actions)
-
- If - Conditions
- (Clicked dialog button) Equal to DialogButtons[10]
- Then - Actions
- Dialog - Change the title of HeroDialog1 to Choose a Hero (1/2)
- Dialog - Show HeroDialog1 for (Triggering player)
- Skip remaining actions
- Else - Actions
On button 10 ("to page 1"), go back to dialog 1.
See the previous note on why we set the title again.
3.3.1.3 The Hero part
- For each (Integer A) from 1 to 10, do (Actions)
-
- Loop - Actions
-
- If (All Conditions are True) then do (Then Actions) else do (Else Actions)
-
- If - Conditions
- (Clicked dialog button) Equal to DialogButtons[(Integer A)]
- Then - Actions
- Unit - Create 1 Heroes[(Integer A)] for (Triggering player) at ((Triggering player) start location) facing Default building facing degrees
- Selection - Select (Last created unit) for (Triggering player)
- Game - Display to (Player group((Triggering player))) the text: (Name of (Last created unit))
- Else - Actions
If we get here, our player actually wanted a Hero.
Since we know that "button 1" should be the Hero in array position 1,
we can do a simple loop.
The loop goes from 1 to 10, since there are 10 buttons.
IF
the button that was clicked on is the one we remembered in position "Integer A" (which goes from 1 to 10),
THEN
we found the button,
and, since we also know which one of those 10 it was,
we can create a unit from our Unit-type array.
Finally, the new Hero will be selected for the player,
so he doesn't have to first click on him.
And we show the name of the Hero.
Which brings us to the end of this "Dialog Tutorial".
|