Adding Materials to a Model
By SD_Ryoko
This tutorial explains how to add your textures and materials to your Warcraft model. Once you have exported your model to MDL format, you need to open the file with a text editor, and manually add your textures.
If you need a text editor to open your MDL file with, we have one in our Tools and Utilities page.
Basic concepts
All models are made up of geosets, or groups of polygons. Every editable mesh that you export from your model is one geoset.
- Each geoset gets one material.
- You can assign any number of geosets to a single material.
- Each material is composed of one or two layers.
- Each layer is a texture.
When you open your file with a text editor, you will see a block of code for Textures, and a block for Materials.
Adding Textures
The textures section of the MDL defines all of your raw textures that can be used. Materials can use either one or two textures. Textures can create basic skins and other things like hero glow and team colors.
The export script only creates one generic texture for you to start with. You need to add in and create any textures you would like to use. It is important to keep the texture format correct when editing it. The MDL conversion leave no room for error. Watch for the capital letters and code blocks.
Each texture has a 'TextureId' that the materials refer to. The textures listed start at 0, so the first texture in your file is TextureId 0. This is important to remember for later, when you create your materials.
Below is an example of five textures, and the different types of transparencies you can use. Comments are shown in red.
We have five textures.
Textures 5 {
TextureID 0. This is a basic texture.
Bitmap {
Image "Textures\Peasant.blp",
}
TextureID 1. This is transparent.
Bitmap {
Image "",
}
TextureID 2. This is transparent, and replaced with player color.
Bitmap {
Image "",
ReplaceableId 1,
}
TextureID 3. This is transparent, and replaced with hero glow.
Bitmap {
Image "",
ReplaceableId 2,
}
TextureID 4. This is transparent, and replaced with the default cliff tile.
Bitmap {
Image "",
ReplaceableId 11,
}
}
Adding Materials
Now that your textures are all listed, you need to add materials. Each geoset in the model (group of polygons) gets ONE material. You can assign a material to as many geosets as you like. A material is made up of either one or two layers.
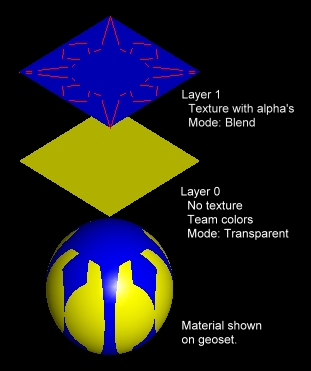
Determining how many materials you need depends on how you designed your model. If you have one geoset that has simple transparency, and another that has hero glow, you will need different materials for each.
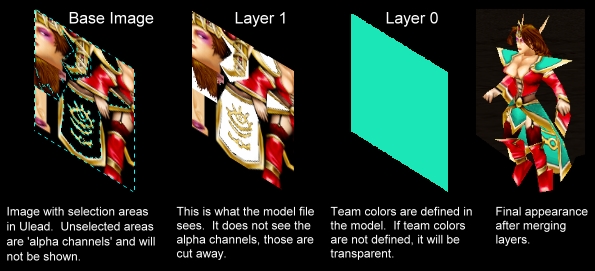
If your texture has no alpha channels (or nothing selected on it when saved) the material only needs one layer.
If your texture does have alpha channels, the first layer is the alpha channel (non-selected area), and the second layer is the graphic image (selected area).
Like textures, each material has a 'MaterialId' that begins with zero.
Below is an example with three materials. Remember, all of the 'TextureId's shown come from my previous example. Comments are in red.
Materials 3 {
A simple peasant texture only needs one layer.
Material {
Layer {
FilterMode None,
static TextureID 0,
}
}
First layer (alpha layer) is our 'no texture'.
Second layer the peasant texture.
(Things NOT selected will be invisible.)
Material {
Layer {
FilterMode Transparent,
static TextureID 1,
}
Layer {
FilterMode Blend,
static TextureID 0,
}
}
First layer (alpha layer) is our team color texture.
Second layer our peasant texture.
(Things NOT selected will be team color.)
Material {
Layer {
FilterMode Transparent,
static TextureID 2,
}
Layer {
FilterMode Blend,
static TextureID 0,
}
}
}
Material layers can be transparent, blended, unshaded, two sided, and have other settings for appearance. This last example shown shows you what kinds of statements you can use in your material.
Material {
Layer {
FilterMode None, Do nothing - opaque graphic image, or
FilterMode Transparent, Render invisible, team color, hero glow, or
FilterMode Blend, Apply alpha's and blend with texture underneath.
Twosided, Render both sides of the geosets polygons.
Unshaded, Do not shade & shadow the layer in game.
static TextureID 0, Which texture this layer uses.
static Alpha .5, A preset transparency setting.
Alpha can also be used for visibily during animation.
This example has 6 sequences, or animation times.
Alpha 6 {
Linear,
46533: 0.748443,
52900: 1,
98133: 1,
99800: 1,
155733: 1,
159800: 0.75,
}
}
}
Assign materials to your geosets
Now your done defining your textures and materials, you need to assign a material to each geoset. At the end of each geoset, you will see a block of code that looks like this:
Anim {
MinimumExtent { -57.8124, -94.0119, -16.3362 },
MaximumExtent { 98.3438, 82.3218, 644.503 },
BoundsRadius 334.903,
}
MaterialID 0,
SelectionGroup 0,
}
The keyword 'MaterialId' defines what material that geoset is. Change this to match the materials you created earlier.
Remember, your first material stars at zero, 'MaterialId 0'.
|