| |
Elevators and Switches
By SilverHawk
Contents
Introduction
Elevators and switches are very special types of destructible doodads. Elevators can be used to move units up and down onto or off of a cliff, just like an elevator in real life. This can create a really cool effect in maps such as RPGs and CTFs. Also, switches, both foot switches and levers, can be used to allow units in the game to control different aspects in the map. Both of these are powerful tools which can greatly benefit almost any map.
Placing an Elevator
The first thing you must do is place the elevator on the map. Basically you can place one anywhere on a map, but there are a few guidelines to follow:
- Be sure that the elevator is touching the cliff. It won't do much good otherwise.
- Be sure that there is at least one full side of the elevator from which to enter, and at least one full side from which to exit. You may want more, but for most purposes, it is good to have only one for each.
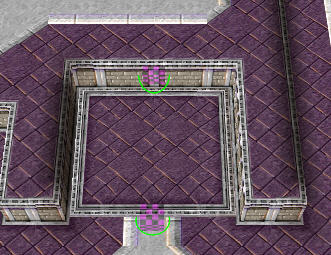
- Be sure that the entry and exit are walkable. To do this, just press "P" while in the World Editor, or go to View -> Pathing (Ground). Any pink areas are not walkable. (Note: It is alright if the exit is pink, so long as it is just a thin line. This will be covered later.
Note: These guidelines apply only to elevators whose purpose is to carry up/down units. There are other purposes (covered later) which do not need to follow these guidelines.
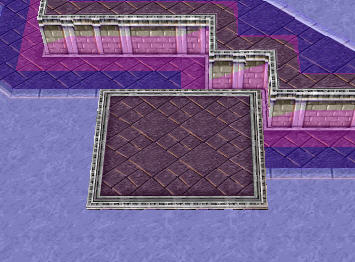
Bad Placement
Bad Placement
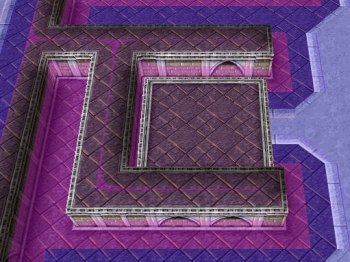
Good Placement
Placing Elevator Walls
Every elevator must have elevator walls. The way these work is, when open, they become walkable, allowing units to enter/exit the elevator. When closed, they act as pathing blockers. Elevator walls should be placed at any possibly entry/exit side, and any place where you do not wish people to enter/exit that isn't already blocked. For example, the elevator below would only need two elevator walls: one each for the entry/exit. It does not need one on the other sides, because the cliff edges prevent units from entering that way.
A few things to note about elevator walls:
- Elevator walls can be rotated 90� by selecting them and changing the angle in the screen that appears.
- If you ever wish to place elevator walls on adjacent sides of an elevator, you must do it in the following way, due to the fact that Blizzard made the elevator walls longer than a side of the elevator. Place the elevator wall near the elevator and select it. Then, hold the control button and used the arrows on the number pad to move it into place.
- Elevator walls that are open by default can be placed by placing the doodad "Elevator Wall (Dead)".
- The way elevator walls work is that a closed elevator wall is living, a doodad which has blockable pathing, and an open elevator is dead, a doodad that has walkable pathing. So, when you open an elevator wall, you are killing it, and when you close an elevator wall, you are reviving it.
Raising/Lowering the Elevator
To raise or lower the elevator, you will need to use triggers. Elevators have three different heights, each given the number 1, 2, or 3, one being the lowest. You can set the height of the elevator by using the action "Destructible - Set Elevator Height" in a trigger. Also, whenever you change the height of an elevator, you must open and close the elevator walls using the action "Destructible - Open/Close Elevator Walls" in a trigger. Any wall(s) you want a unit to be able to walk over should be open, and any wall(s) you do not want units to walk over should be closed. The trigger below will demonstrate this.
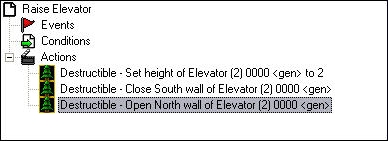
There are a number of different events that could be used for this trigger. One possible way is to create a region on the elevator and have the elevator raise when a unit enters that region. Another is to have the elevator controlled by a switch (covered later). For more information on triggers, see the Trigger Basics Tutorial.
Advanced Elevator Techniques
For those seeking to do more things with elevators, here are three suggestions and explanations on how to do each.
- 1. Underwater elevators
-
- These work in virtually the same way as normal elevators, but you need to do something special to create them. Go to the "View" menu at the top of the screen, and uncheck the option water, which will make the water invisible in the editor. From here, create the elevators just as you would normally. You can do all sorts of cool things such as a path that rises out from the water, a hidden shop that rises every once in a while, etc.
-
- 2. Elevator Mazes
-
- An elevator maze is a square region filled with elevators, where the goal is to get across to the other side. Typically, the elevators rise and fall what appears to be randomly (you could do it randomly, but it's a bit complicated). This would require the above mentioned technique to place adjacent elevator walls and a good deal of triggers.
-
- 3. Elevator Traps
-
- An elevator trap is an elevator that goes down into the ground and traps a unit(s) there. To make one, build a pit in the ground that is the same size as the elevator, then, in your initialization trigger, add an action that sets the trigger to ground level. You can then add another trigger that lowers the elevator when a unit enters it.
Levers
A lever is basically just a destructible that switches position when attacked. Using a lever is fairly simple. First, you must place a lever wherever you want. Then, you need to create a trigger. The event should be "Destructible dies.", with the destructible being your lever. For the actions, you should have whatever actions you want performed when the lever is hit, followed by "Destructible - Resurrect Destructible" if you want the lever to be used again. An example trigger is shown below.
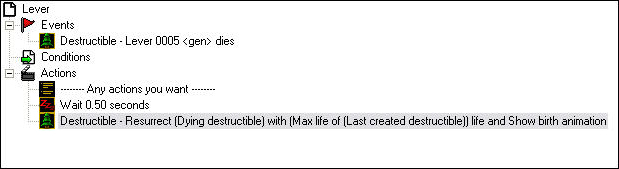
Note: The lever doodad can only be found in the Dungeon tileset. You will need to use the Doodad Layer to access it.
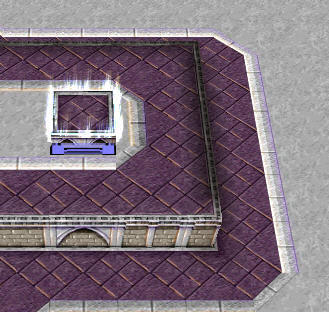
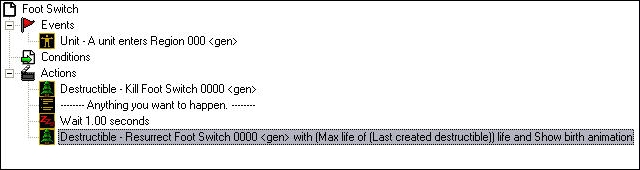
Foot Switches
Foot switches are very similar to levers but different in one major way. Since they cannot be attacked, the event "Destructible Dies" cannot be used. Instead, we have to create a region on the switch and detect when a unit walks into it. Another important note about foot switches is that in most cases, you should be sure to turn off the trigger after it runs. Otherwise, your actions would run every time the unit entered the region. See the trigger and screenshot below for an example.
Summary
All of the techniques described in this tutorial are demonstrated in the demo map below. It should give an adequate description of their use.
Download sample map...
|
|