Multiboards
By Senkin
How to make a Multiboard
 |
- Multiboards can display text, icons and values.
- Multiboards can use the common Warcraft color codes.
- Multiboards can be assigned a variable, to show and hide them easily.
- A Multiboard cannot be created at map initialization.
- A Multiboard is more advanced than a Leaderboard.
- Multiboards can be minimized during game play.
- Multiboards are a minimizable score board for players to keep track of their kills
or points for many kinds of things like hero level and deaths.
|
When laying out your multiboard, remember that they accept the standard Warcraft color codes and characters. You can use a color coding program to create a nice title, and space it out on different lines as shown. You can also later modify the title and properties of the multiboard contents. All you need to create a multiboard is two triggers. One to create the board, and one to keep score on kills.
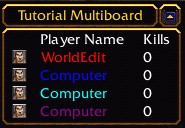
Multiboards can have as many rows and colums you need to have, as long as you fit it within the screen's size; In the case of the multiboard you will be making in this turorial we will have 3 columns, Player Icons, Player Names, Player Kills.
A multiboards can keep track of several different things like integer based info (kills) and string based info (player colors). Maybe you want to set the colors eatch player in the game uses. Because the board works off integers/strings, you can assign it any integer/string values you like.
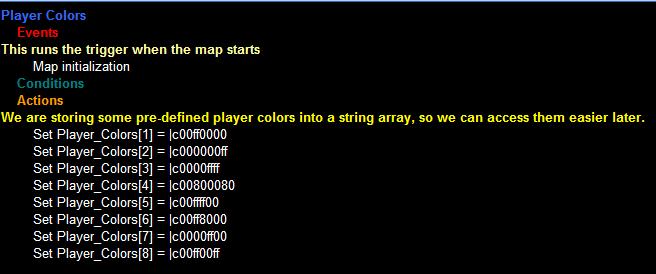
In the multiboard we are making, we have the multiboard setting the colors to the players by the player colors Blizzard standardly uses. (Red = Player 1 and 9 is Player Grey). Of course, this is the most common use for a multiboard (Along with other things).
So I will first need to create a variable to keep track of the colors for each player. I will open the variable editor, and create a new string variable called Player_Colors. Then I will check the Array box to keep track of more than one value.
like so.
Now to being able to modify and make multiboards you need to understand a few things about rows and colums.
First of all we are going to understand what rows and colums are.
- The Row is the Horizontal line in the multiboard that is changeable in numbers and sizes.
- The Column is the vertical line in the multiboard that is also changeable in numbers and sizes.
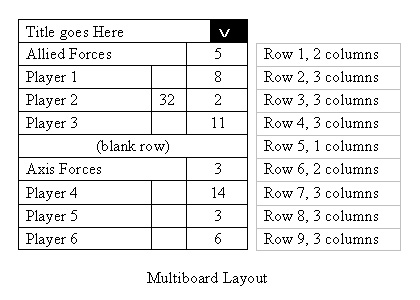
In this example image to the left shows an good example of what rows and colums are and look like in the multiboard.
To edit the multiboard I made you may have to understand it a bit more and may have to be very good with triggers (Be ready for advanced multiboard making).
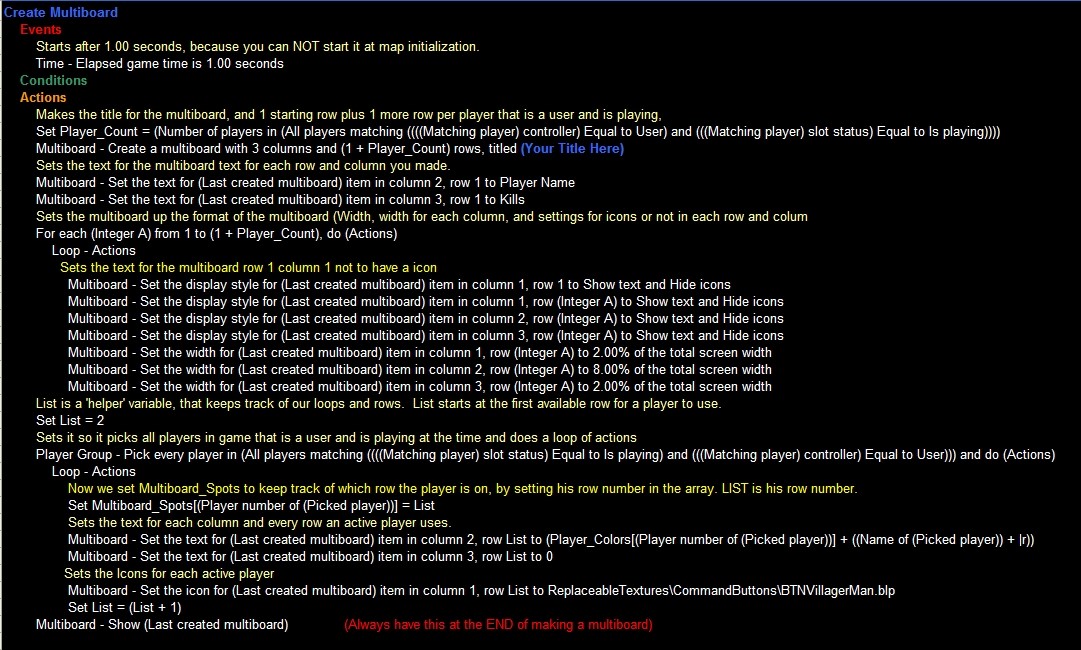
Below is an image of the multiboard you are to make and the descriptions of everything your doing as you make it.
A multiboards can keep track of several different things. Maybe you want your board to keep track of kills. If your playing capture the flag, you would want to keep track of flags stolen. Because the board works off integers, you can assign it any integer values you like.
In the multiboard we are making, we have the multiboard keeping track of kills a player makes. Of course, this is the most common use for a multiboard (Along with other things).
So I will first need to create a variable to keep track of kills for each player. I will open the variable editor, and create a new integer variable called Kill_Count. Then I will check the Array box to keep track of more than one value.
like so:
- Variable Name: Kill_Count
- Variable Type: Integer (Array - Size 1)
- Initial Value: 0 (default)
Last and not least is the Trigger Functions for the multiboard. Here will give you the jist of how each multiboard trigger works.
- Multiboard - Create --> Creates a multiboard with the number of columns and rows you specify and the multiboards title
- Multiboard - Destroy --> Destroys a multiboard you choose (default is last created multuiboard)
- Multiboard - Show/Hide --> Shows or Hides a multiboard (default is last created multiboard) Cannot use with map initalization
- Multiboard - Show/Hide All--> Shows or hides all multiboards
- Multiboard - Minimize/Maximize --> Minimizes or maximizes the multiboard (default is last created multiboard)
- Multiboard - Clear --> Clears the multiboard (default is last created multiboard)
- Multiboard - Change Title --> Changes the title of the multiboard (default is last created multiboard) to what you want it to be
- Multiboard - Change Title Color --> Changes the multiboard's (default is last created multiboard) colors to (100%, 100%, 100%) with 0% transparacy. (The color values are Red, Green, Blue and 100% transparacy is compleatly invisable.
- Multiboard - Change Number of Rows --> Changes how many rows the multiboard (default is last created multiboard) has.
- Multiboard - Change Number of Columns --> Changes how many columns the multiboard (default is last created multiboard) has.
- Multiboard - Set Item Display Style --> Changes the multiboard (default is last created multiboard) for the set column and row to have or not to have a cirten icon or text.
- Multiboard - Set Item Text --> Changes the multiboard (default is last created multiboard) for the set column and row to have a cirten text
- Multiboard - Set Item Color --> Changes the multiboard's (default is last created multiboard) colors to (100%, 100%, 100%) with 0% transparacy. (The color values are Red, Green, Blue and 100% transparacy is compleatly invisable.
- Multiboard - Set Item Width --> Changes the multiboard (default is last created multiboard) width to a % of the multiboards total width.
- Multiboard - Set Item Icon --> Changes the multiboard (default is last created multiboard) for the set column and row to have a cirten icon
For people who dont know how to make those triggers and variables like what is above then you can download this example multiboard I made that is the same as the picture above (the multiboard is is like the Multiboard SD_Ryoko as posted in the free trigger codes post but Is modded to be more easy to understand and simple to use.
You can download this map from our Free Trigger Thread.
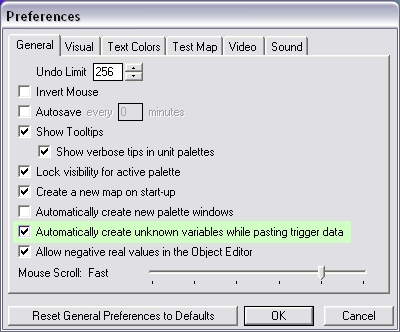
NOTE! You must first go into the world editor and click File -> Preferences and set it up so it automatically makes the variables needed for the copied trigger(s). Example below
|


