Creating Custom Tiles
By SD_Ryoko
Introduction to Custom Tiles
This tutorial is about creating and editing custom tiles. Before we alter a tile, you will need the Warcraft III Image Extractor II.
This program allows you to save images from the Warcraft III database, and convert files from .TGA format to .BLP format. You can
download the image tool from below.
We will also need a decent program to edit the tile. The most important requirement is that the program can open TGA files. I am
using ULEAD Photo Impact.
Want help using the editing tools?
Some great tutorials on image editing techniques at Warcraft III Campaigns
Exporting a Tile
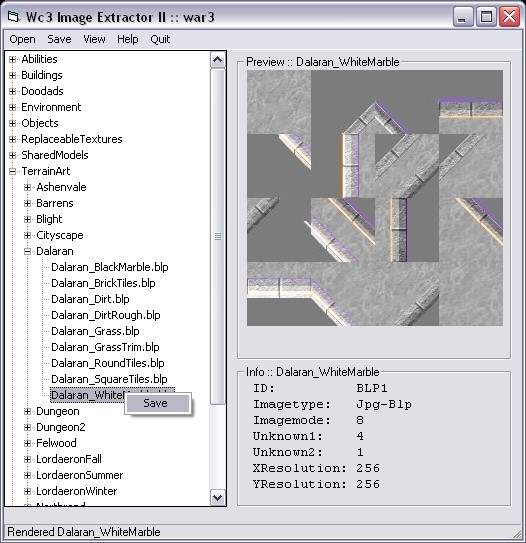
In this tutorial we are going to modify the 'Dalaran White Marble tile'. First, we have to open the warcraft database and save it to a new file. Some tiles
are found inside war3.mpq, and the newer ones inside war3x.mpq. Both files are in the Warcraft III Directory.
The image extracting tool has a nice tree showing the different images inside the database. The Dalaran White Marble tile will be
listed under TerrainArt, inside war3.mpq.
After we find the tile we want to edit, right click on the tile and click SAVE. I prefer to keep the original file name when
I save an image. We need to save it in TGA format so we can edit it ourselves.
 Layout of a Tile
First I will open the tile in Photo Impact. This will be the TGA format file I saved earlier. When I open the file, I can
see there are already selected areas on the tile. Any area NOT selected on the image will NOT show up in the game. If we want
to preserve those selected areas, we will need to save the selection. Photo Impact allows
me to store the existing selection under the selection menu.
|
- Areas not already selected on the tile won't show in the game.
- Save the selection for later to preserve those areas.
- Dotted lines represent existing selection.
- Use 'Selection -> Store' when using ULEAD.
|
Now we can edit the tile without worrying about restoring its original condition. You'll see I have created a brown brick in the
example picture. You can use anything you like for a tile. But I recommend you start with a texture that repeats, like mine. If
your texture doesn't repeat, its going to look REAL bad inside the game.
 |
Did you know?
You can make any image a repeating image, by mirroring it in both directions!
|
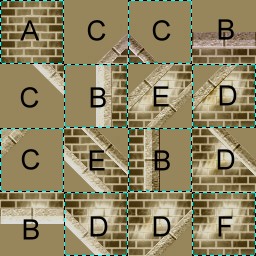
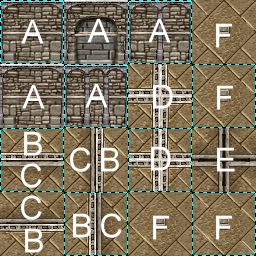
So the next important part is, how does a tile work? Each tile is made of 16 squares. By default, they are 64x64 pixels in size. Each
'square' has a different function inside the tile. I have labeled each one, and what it does.
|
Standard Tile Layout
A. Basic repeating tile.
B. Straight edge tiles.
C. Outer corner tiles, and part of diagonal edges.
D. Inner corner tiles, and part of diagonal edges.
E. Single width of tile when placed diagonally.
F. Alternate tile. Appears randomly in big patches.
Standard tiles are found in 'TerrainArt', inside the database.
|
|
Cliff Tile Layout
A. Random sides of the cliff
B. Straight edge tiles, top of cliff
C. Straight edge tiles, bottom of cliff
D. Corner tiles, editor chooses one randomly.
E. Corner tiles, bottom of cliff
F. Appear on bridges and elevators.
Cliff tiles are found in 'ReplaceableTexures\Cliff', inside the database.
|
Cliff tiles import differently than standard tiles!
There are two kinds of cliff. But there are many names for cliff inside the image extractor! This is only because
you can't have more than one of the same filename. Use the paths below for replacing a cliff.
Replacing a cliff tile replaces the default cliff tile, so no matter WHAT tileset you use in THAT map, the cliff will be replaced.
| Type | Name | Import Path |
| Jagged Cliff | Cliff0 | ReplaceableTextures\Cliff\Cliff0.blp |
| Straight Cliff | Cliff1 | ReplaceableTextures\Cliff\Cliff1.blp |
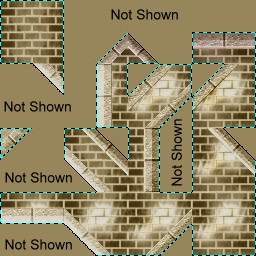
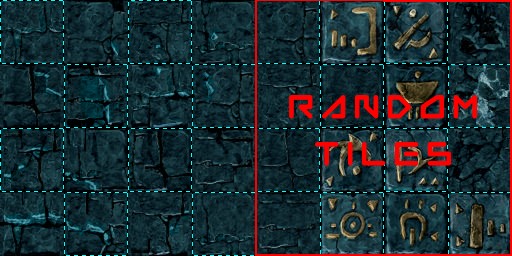
Special Large Tiles
These are larger versions of a tile. They are most common for grass textures, like Fellwood. They have an additional 16 tiles that
appear randomly in large areas. The example below is from the Icecrown Glacier tileset. Note the 16 extra tiles. You can see in the editor
how these work. For grass, they are often rugged spots, rocks or dirt patches in the terrain.
 Saving our Tile
Before we save our tile, we have to remember to restore our original selection. This preserves the original area that will be shown in the game.
To do that really easily, we can load the original selection under the Selection
menu, by clicking on Load Selection. You can also change the selection if you want, and change what the game will display.
Save your tile as a new file in TGA format. Its always a good idea to keep the original file, in case you made a mistake.
- Load the original selection to preserve displayed areas.
- If an area on the tile is not selected, its invisible.
- Save your tile in TGA format.
Importing our Tile
Before we import the tile into your map, we need to convert it back to a BLP format. Open the Warcraft III Image Extractor,
and open your new image. Then click SAVE, and save your new tile as a .BLP file. The image tool will prompt you for the image quality.
Reducing the quality may save some file space in your map, but you can leave it at 100 percent. I usually use 70-75 without losing too
much detail.
Inside World Editor, load the Import Manager under the Module menu. Click on File, Import and open the BLP file
that you just saved. Now you need to change the custom path. Double click the item inside the import manager, and check the box
that says Use Custom Path. Change the path to the EXACT path of the tile you want to replace. Of course, you can change ANY
tile you like of the same size. For our project, it will be TerrainArt\Dalaran\Dalaran_WhiteMarble.blp
- Open your tile and save it in BLP format.
- Import your tile into World Editor.
- Change the custom path to the exact tile you want to replace.
- Your tile is good for ANY tile the same size.
- But mine will be Dalaran White Marble.
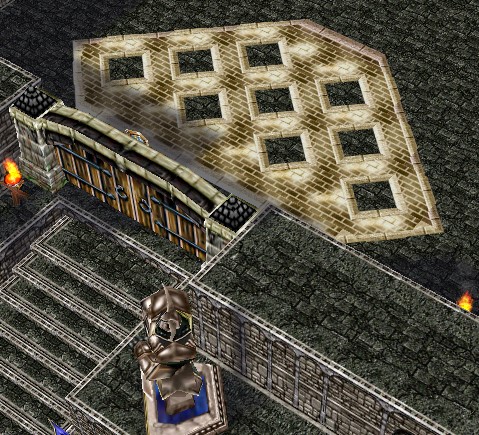
Completed Work
After importing the tile, I restarted my editor so the tile will show. Heres what it looks like inside the editor.
|