Creating and Editing Skins
By SD_Ryoko
Introduction to Skinning
This tutorial is about creating and editing skins. Before we start on creating a new skin, you will need the Warcraft III Image Extractor II.
This program allows you to save skins from the Warcraft III database, and convert files from .TGA format to .BLP format. You can
download the graphic image tool from below.
We will also need a decent program to edit the skin. The most important requirement is that the program can open TGA files. I am
using ULEAD Photo Impact.
Want help using the artists tools?
Some great tutorials on skin art techniques at Warcrat III Campaigns
Exporting a Skin
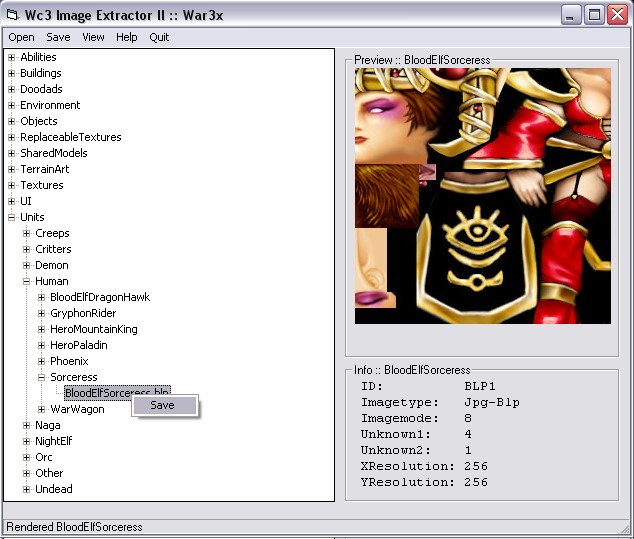
In this tutorial we are going to modify the sorceress skin. Since I have The Frozen Throne expansion, I am going to open up the file
'war3x.mpq' into Image Extractor. Then I am going to locate the sorceress skin and save it to a new file. Older skins are inside the 'war3.mpq' file,
and newer skins are inside 'war3x.mpq'.
The image extracting tool has a nice tree showing the different skins inside the database - the sorceress skin will be listed under 'Units\Human\Sorceress', and will be called
'BloodElfSorceress.blp'.
After we find the skin we want to edit, right click on the skin and click SAVE. I prefer to keep the original file name when
I save a graphic image. We need to save it in TGA format so we can edit it ourselves.
Editing our Skin
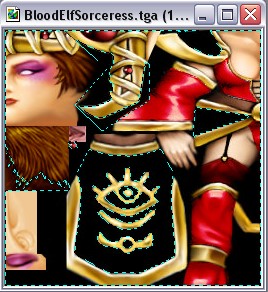
First I will open the skin in Photo Impact. This will be the TGA format file I saved earlier. When I open the file, I can
see there are already selected areas on the skin. Any area NOT selected on the skin will show up in the game as the
players color. If we want to preserve those colored areas, we will need to save the selection. Photo Impact allows
me to store the existing selection under the selection menu.
- Areas not already selected on the skin are player colors.
- Save the selection for later to preserve those colors.
I want to change the color of her dress and change the symbol on her skirt. So first we have to clear the current selection,
and select the colored areas we want to change. Because we want to select multiple areas and change them the same, I will change
the selection mode to addition. This way, we can keep adding to the selection until we have all the colored areas selected.
The easiest way to do this is using the lasso tool. Not only can you hold the mouse button down and trace the different
shapes, you can create short lines as well.
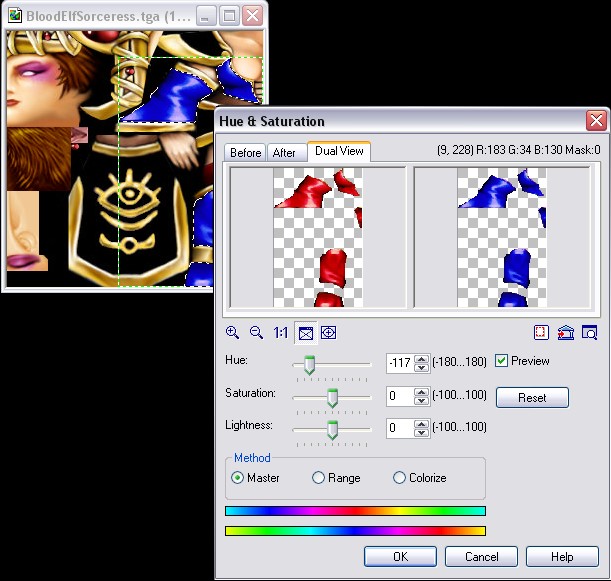
It is easy to change the colors of the skin and still retain the original shading. Once we have all our areas selected, we
will use the Hue and Saturation menu to adjust the dress. This tool easily replaces existing colors, and can be adjusted
to find the color that best suits our application. I have chosen a deep blue color for her dress.
- Hue and Saturation easily adjusts colors.
- Select multiple areas at once to adjust evenly.
Saving our Skin
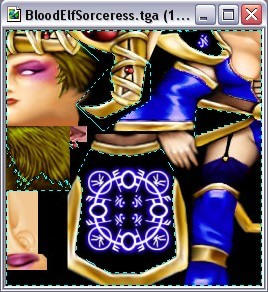
When we are done editing the skin, we should have an graphic image that looks like the one below. I have used the Hue and Saturation
tool to change the color of her hair, and I have added my own design to her dress. I copied it from another file and pasted
it into the new skin, from the Orc Voodoo ability.
Before we save it, we have to remember to restore our original selection. This preserves the original player colors.
To do that really easily, we can load the original selection under the Selection
menu, by clicking on Load Selection. You can also change the selection if you want to change where the player colors show.
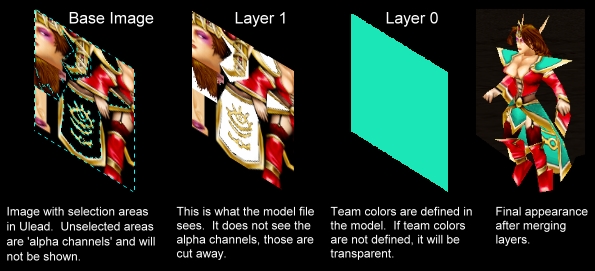
On my skin, I do not wish to have any player colors at all, so I will select the whole image. Also, if there is no selection
there, and there is no player color there defined in the model, it will appear invisible. The player color areas are defined
by the model, complimented by the skin. You can use this to cut areas out, like horns.
Save your skin as a new file in TGA format. Its always a good idea to keep the original file, in case you made a mistake.
- Load the original selection to preserve player colors.
- Selecting the whole graphic image will eliminate player colors.
- If no selection or player colors in an area, its invisible in game.
- Save your skin in TGA format.
Importing our Skin
Before we import the skin into your map, we need to convert it back to a BLP format. Open the Warcraft III Image Extractor,
and open your new graphic image. Then click SAVE, and save your new skin as a .BLP file. The image tool will prompt you for the graphic image quality.
Reducing the quality may save some file space in your map, but you can leave it at 100 percent. I usually use 70-75 without losing too
much detail.
Inside World Editor, load the Import Manager under the Module menu. Click on File, Import and open the BLP file
that you just saved. Now you need to change the custom path. Double click the item inside the import manager, and check the box
that says Use Custom Path. Change the path to the EXACT path the original skin was in. For our project, it will be
Units\Human\Sorceress\BloodElfSorceress.blp
- Open your skin and save it in BLP format.
- Import your skin into World Editor.
- Change the custom path to the exact original.
This is a great skin, and you may download it here.
BloodElfSorceress.zip
|